How to Implement Pagination with JavaScript
Pagination is the process of dividing a large set of data into smaller individual pages, making the information easier to process and digest when delivered to the user. In this tutorial, we are going to demonstrate how to implement a JavaScript pagination system in three different ways.
Why you need JavaScript pagination
Creating a pagination system has several benefits. Imagine you have a blog with thousands of articles. It would be impossible to list all of them on one page. Instead, you could create a pagination system where the user can navigate to different pages.
Pagination also reduces server load, as only a segment of the data needs to be transferred every time a request is made. This enhances your application's overall performance, delivers a better user experience, and, as a result, improves the website's SEO.
To get started, we have prepared a demo project here:
How to implement JavaScript pagination - the easy way
When you think about dividing items into pages, what is the easiest logic that comes to mind?
For example, you could retrieve all articles from the database as a single array and then split them into smaller arrays based on a certain page size using the splice() method.

index.js
import express from "express";
import { PrismaClient } from "@prisma/client";

const app = express();
const port = 3001;

const prisma = new PrismaClient();

app.set("views", "./views");
app.set("view engine", "pug");

app.use(express.urlencoded({ extended: true })); // for parsing application/x-www-form-urlencoded
app.use(express.json());

app.use("/statics", express.static("statics"));

// The easy way
// ===========================================================
app.get("/pages/:page", async function (req, res) {
  const pageSize = 5;
  const page = Number(req.params.page);
  const posts = await prisma.post.findMany({});

  const pages = [];
  while (posts.length) {
    pages.push(posts.splice(0, pageSize));
  }

  const prev = page === 1 ? undefined : page - 1;
  const next = page === pages.length ? undefined : page + 1;

  res.render("list", {
    posts: pages[page - 1],
    prev: prev,
    next: next,
  });
});

app.listen(port, () => {
  console.log(
    `Blog application listening on port ${port}. Visit http://localhost:${port}.`
  );
});
In this example, the page size is set to 5, meaning there will be five posts on every page.
Line 21, page is the current page number.
Line 22, posts is an array of all posts stored in the database.
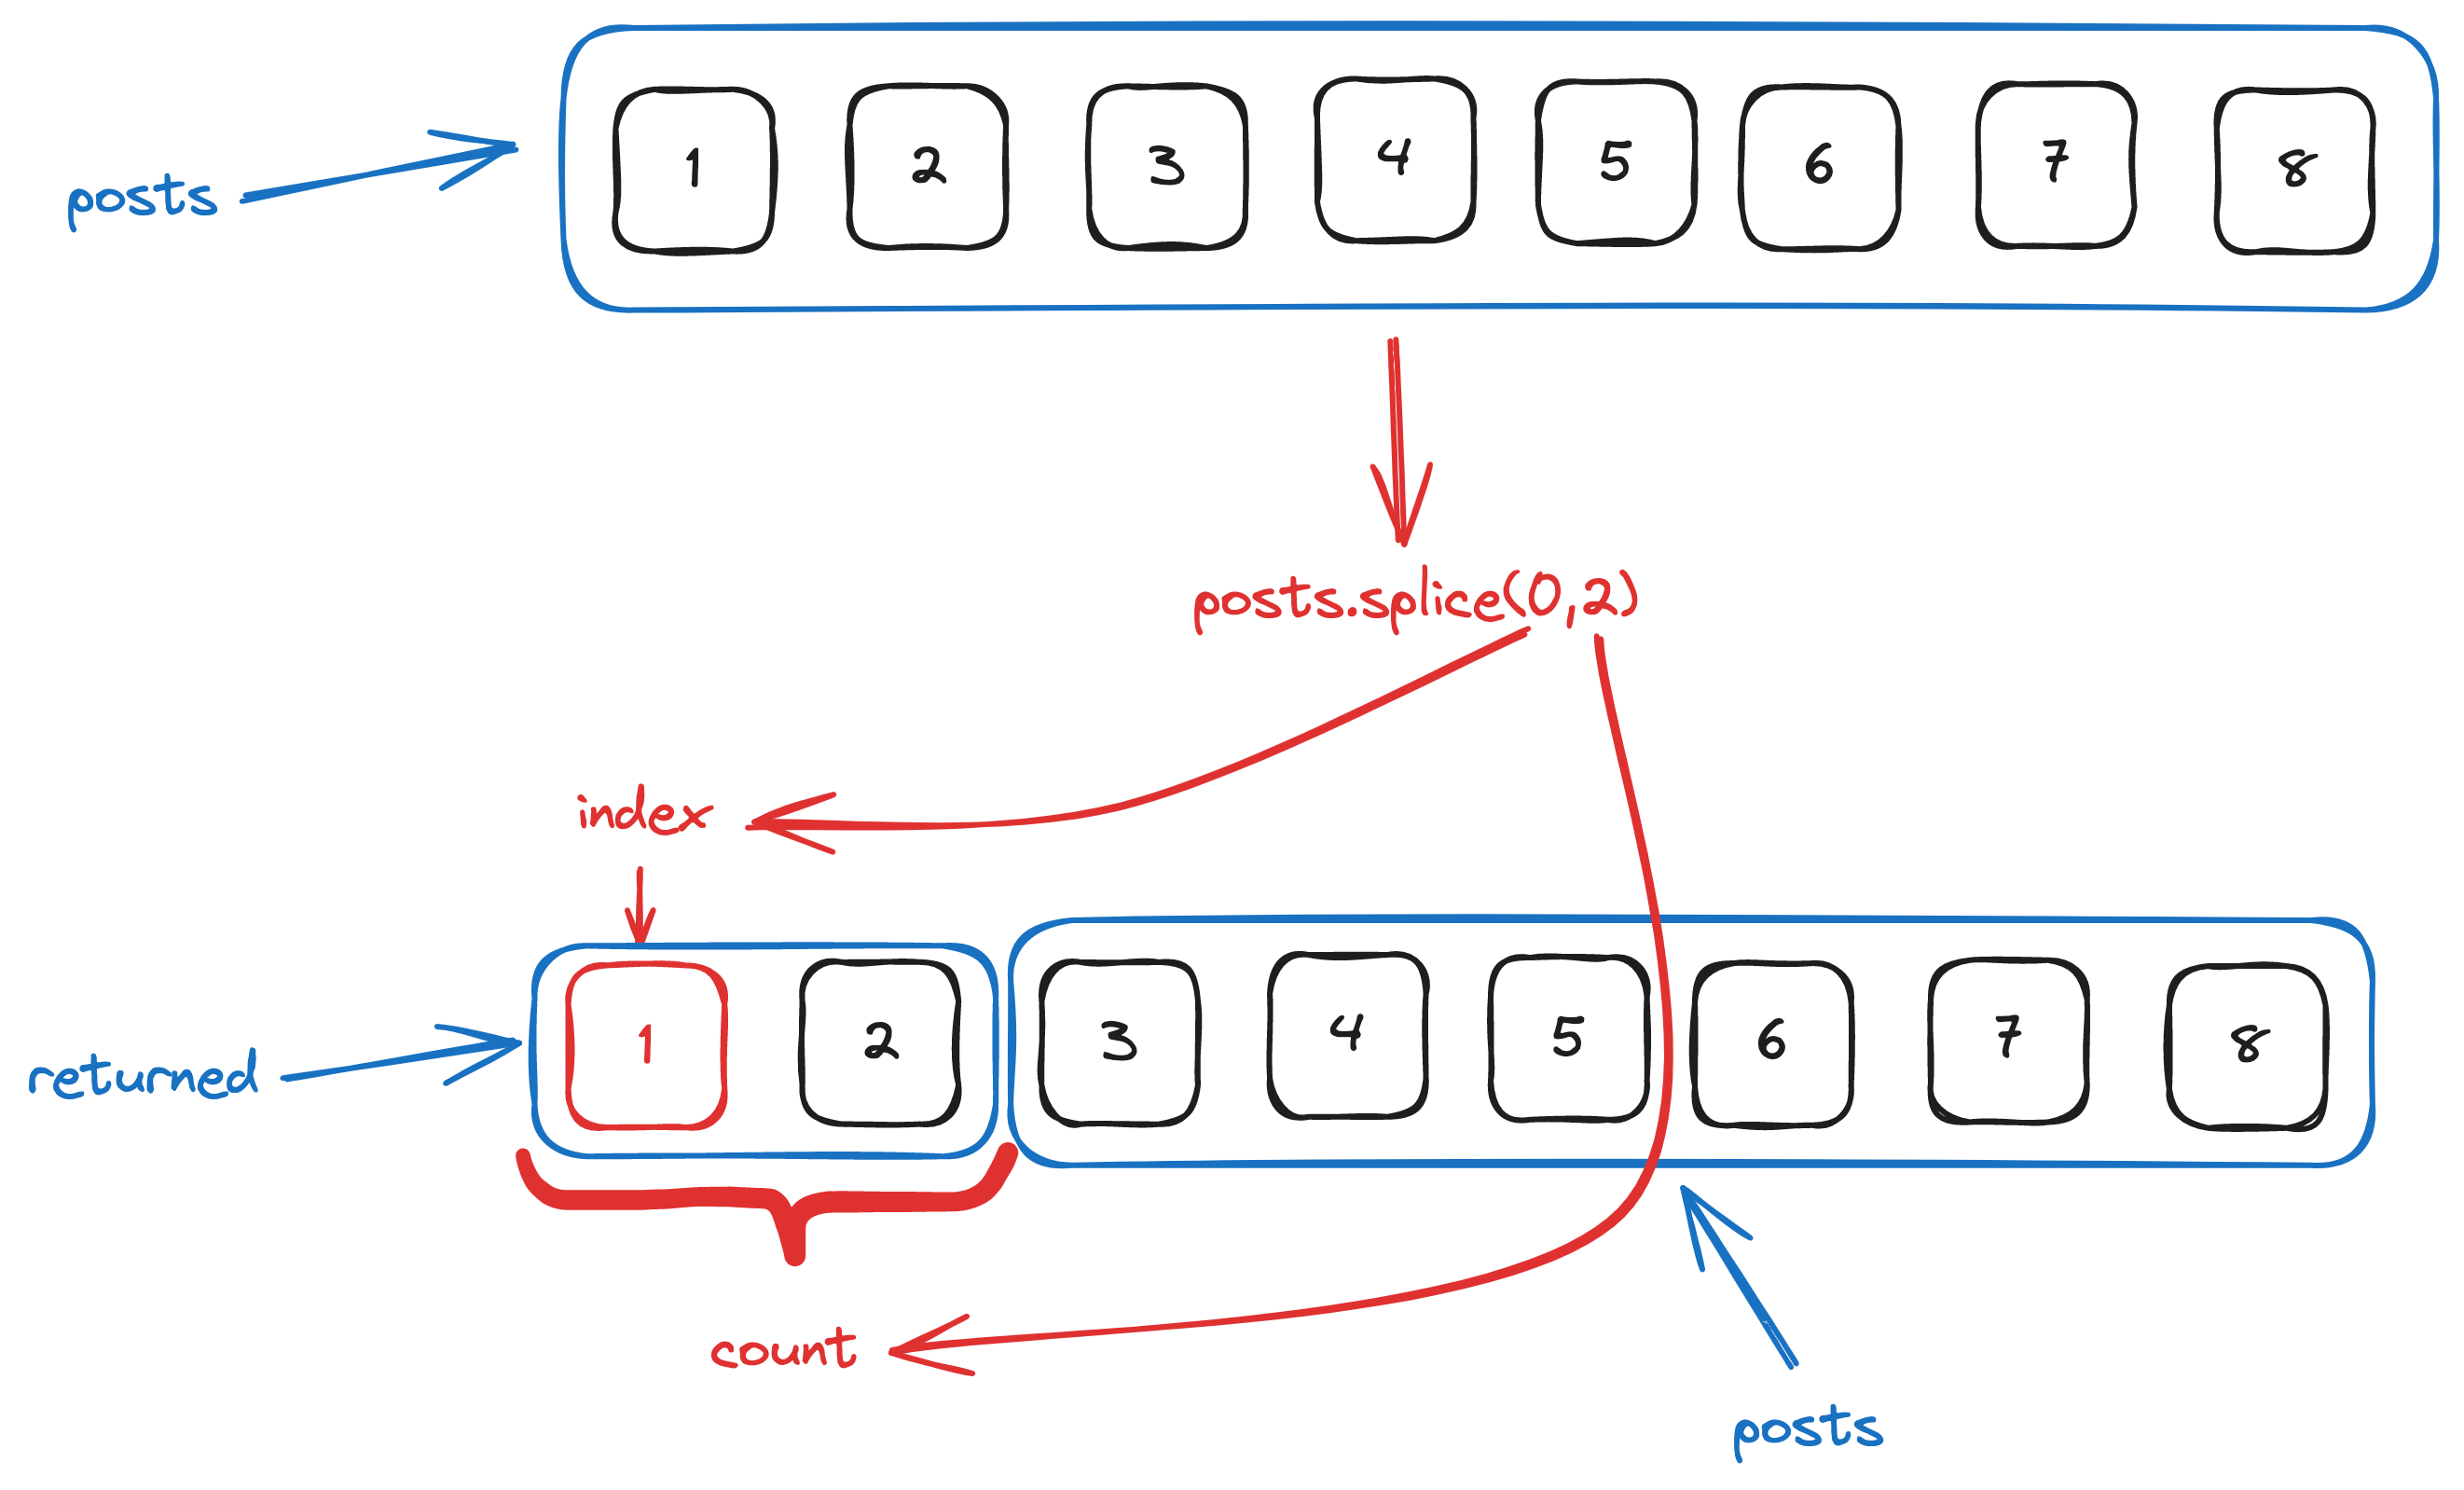
Line 24 to 27, we split the array based on the page size. The splice(index, count) method takes two parameters, index and count. It splices and returns count number of elements from the array, starting from index. The remaining part of the array will be assigned to posts.
Line 29 and 30 each point to the previous and next page based on the current page number.
const prev = page === 1 ? undefined : page - 1;
const next = page === pages.length ? undefined : page + 1;
If the current page is 1, prev will equal undefined because there is no previous page in this case. Otherwise, it equals page - 1.
next, on the other hand, will equal to undefined if the current page equals pages.length, meaning the current page is the last one. Otherwise it equals page + 1.
And lastly, the posts for the current page (pages[page - 1]), along with prev and next, will be sent to the corresponding view (list.pug).
list.pug
ul
    each post in posts
        li
            a(href="#") #{post.title}
    else
        li No post found.

if prev
    a(href=`/pages/${prev}`) Prev

if next
    a(href=`/pages/${next}`) Next
As you probably have realized, this solution has one problem. You have to retrieve all the posts from the database before splitting them into individual pages. This is a huge waste of resources, and in practice, it will likely take a very long time for the server to process this amount of data.
How to implement offset-based pagination in JavaScript
So we need a better strategy. Instead of retrieving all the posts, we can first determine an offset based on the page size and the current page number. This way, we can skip these posts and only retrieve the ones we want.
In our example, the offset equals pageSize * (page - 1), and we are going to retrieve the pageSize number of posts after this offset.
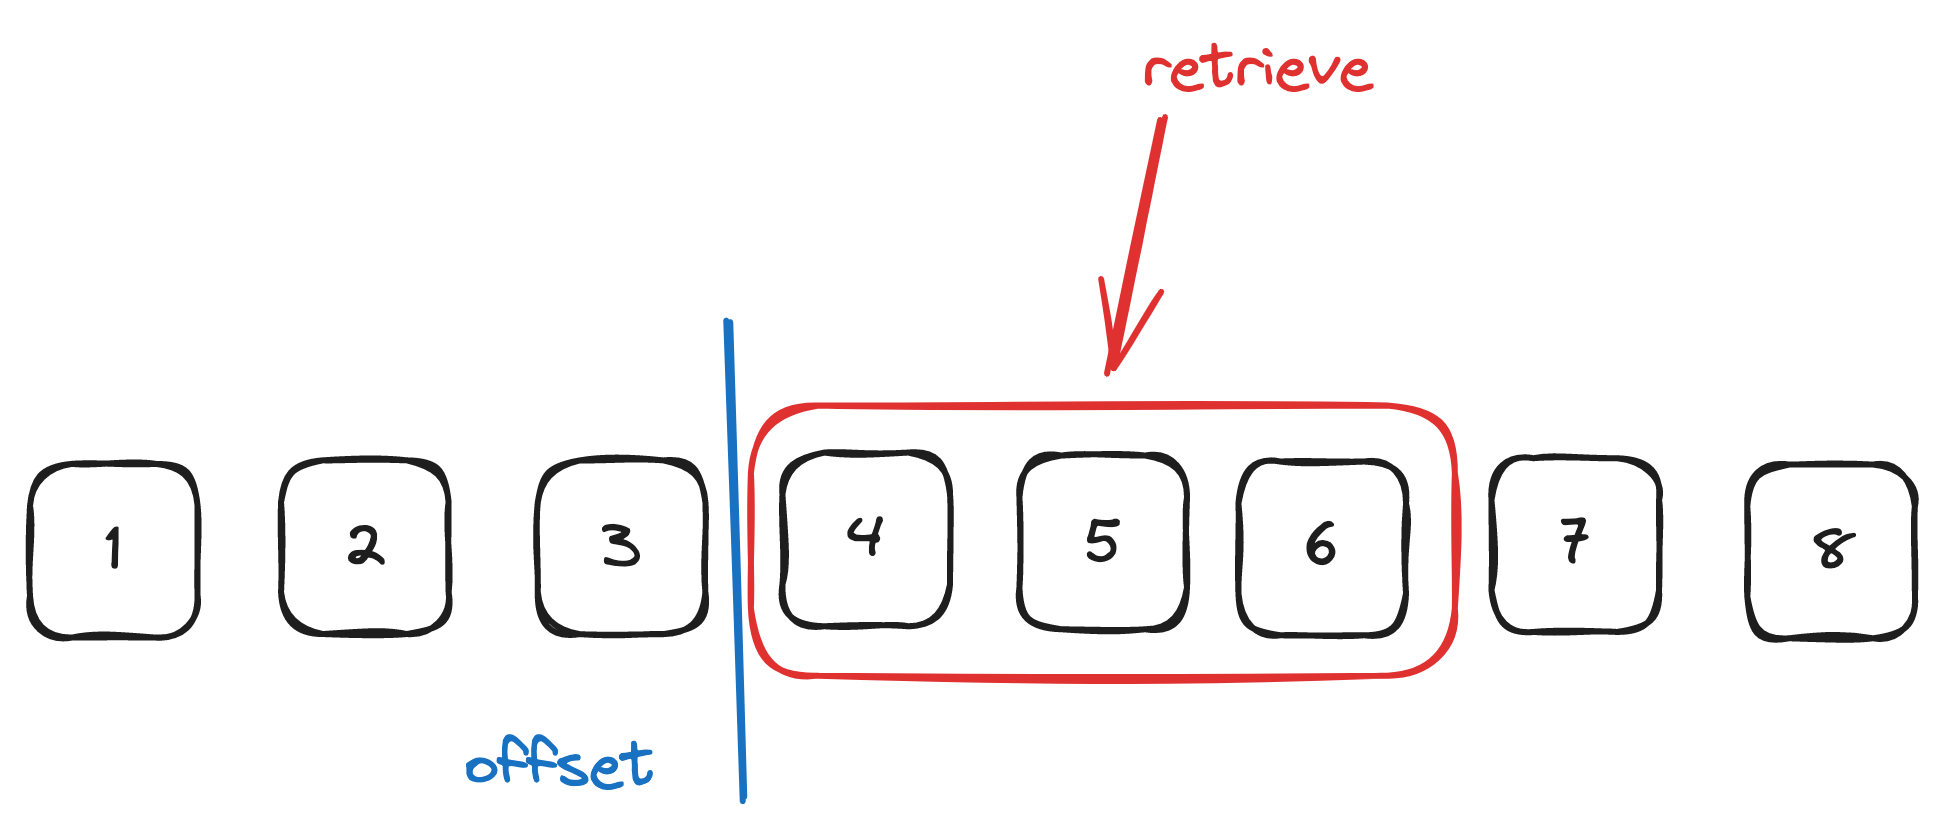
The following example demonstrates how this can be done using Prisma. The skip specifies the offset, and take defines the number of posts to retrieve after that offset.
// Offset pagination
// ===========================================================
app.get("/pages/:page", async function (req, res) {
  const pageSize = 5;
  const page = Number(req.params.page);
  const posts = await prisma.post.findMany({
    skip: pageSize * (page - 1),
    take: pageSize,
  });

  const prev = page === 1 ? undefined : page - 1;
  const next = page + 1;

  res.render("list", {
    posts: posts,
    prev: prev,
    next: next,
  });
});
The frontend remains the same in this case.
list.pug
ul
    each post in posts
        li
            a(href="#") #{post.title}
    else
        li No post found.

if prev
    a(href=`/pages/${prev}`) Prev

if next
    a(href=`/pages/${next}`) Next
Of course, other ORM frameworks can achieve the same result, but the logic remains the same. At the end of this tutorial, we will provide some resources to help you create JavaScript pagination systems using other ORM frameworks.
How to implement infinite scroll in JavaScript
Besides the offset-based pagination, there is a popular alternative called cursor-based pagination. This strategy is often used to create infinite scroll or the Load More button.
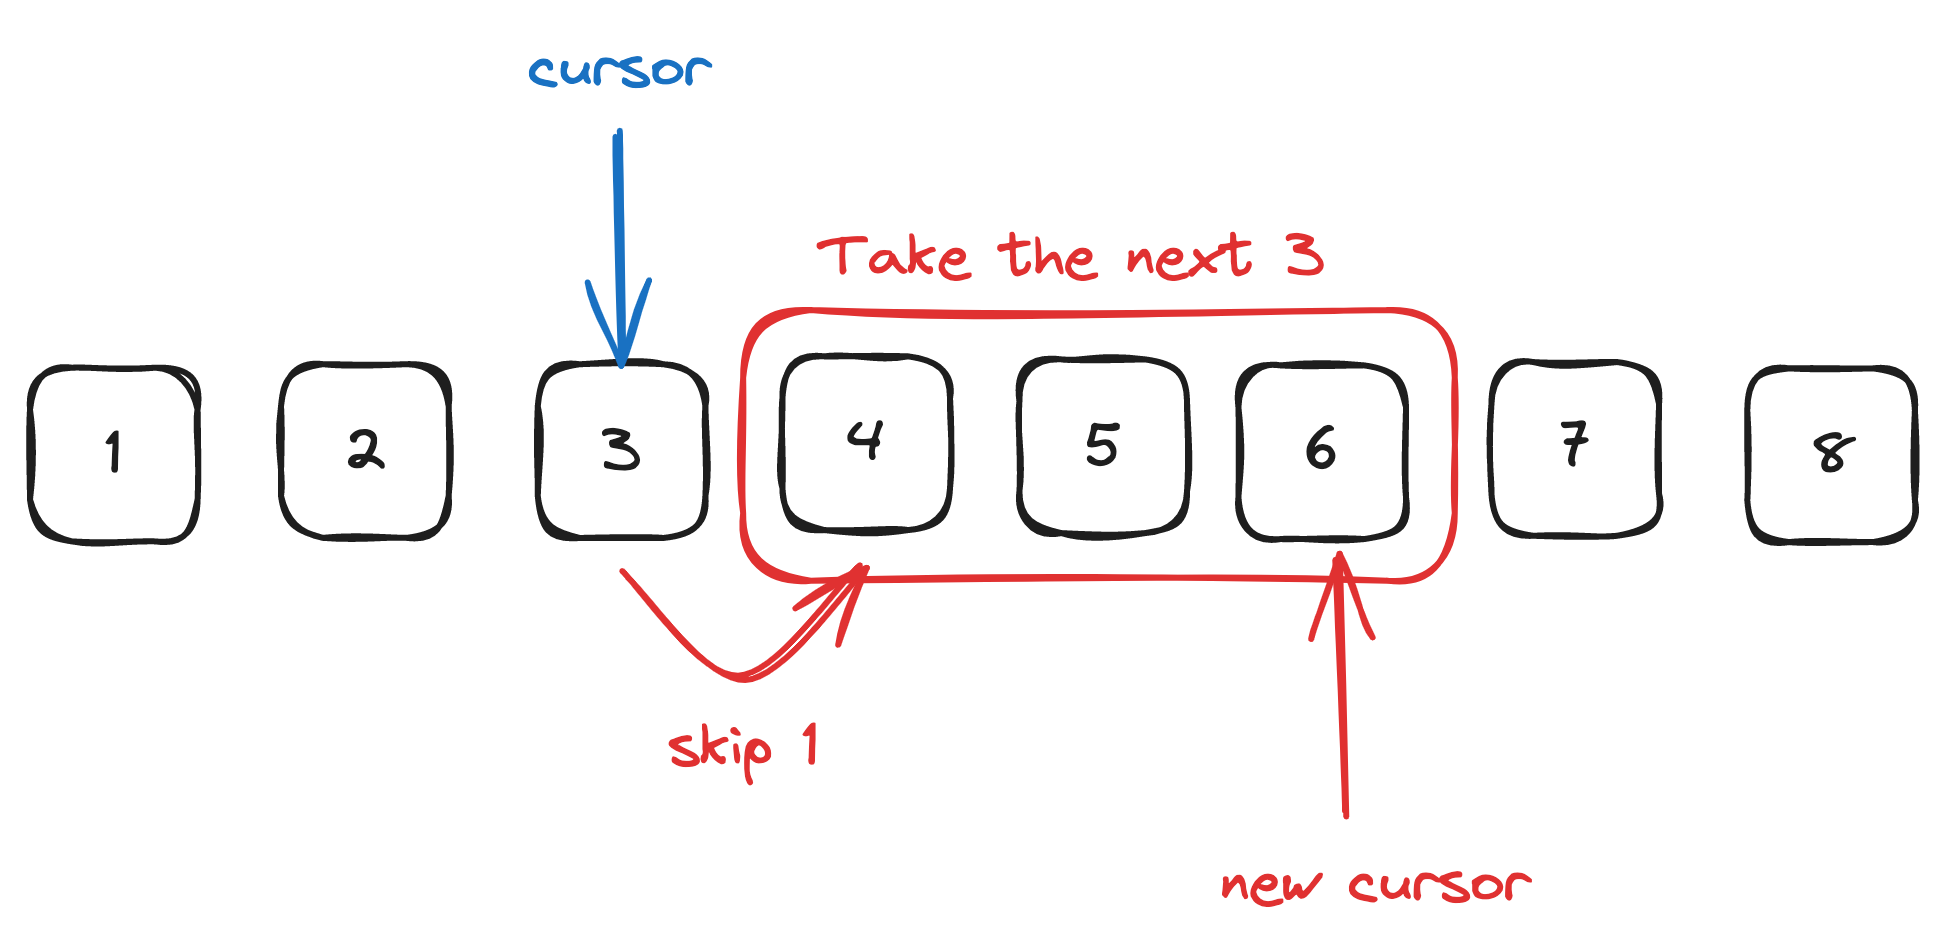
As the name suggests, the cursor-based pagination requires a cursor. When the user first visits a list of posts, the cursor points to the last item in the array.

When the user clicks on the Load More button, a request is sent to the backend, which returns the next batch of posts. The frontend takes the transferred data and programmatically renders the new posts, and the corresponding cursor is updated to point to the last item of this new batch of posts.
When it comes to actually implementing this cursor-based pagination, things get a bit more complicated, as this strategy requires the frontend and the backend to work together. But don’t worry, we’ll go through this step by step.
First of all, let’s create the root route (/). When the user visits this page, the first ten posts will be retrieved, and the cursor will point to the id of the last post. Recall that at(-1) retrieves the last element of the array.
//Cursor-based pagination (load more)
// ===========================================================
const pageSize = 10;

app.get("/", async function (req, res) {
  const posts = await prisma.post.findMany({
    take: pageSize,
  });
  const last = posts.at(-1);
  const cursor = last.id;

  res.render("list", {
    posts: posts,
    cursor: cursor,
  });
});
Notice that the cursor will be transferred to the frontend as well. This is very important, and you must make sure that the cursor on both ends is always in sync.
list.pug
button(id="loadMore" data-cursor=`${cursor}`) Load More

ul(id="postList")
    each post in posts
        li
            a(href="#") #{post.title}
    else
        li No post found.

script(src="/statics/js/app.js")
The initial value of the cursor will be saved in the attribute data-cursor of the Load More button, which can then be accessed by JavaScript in the frontend. In this example, we put all the frontend JavaScript code inside /statics/js/app.js.
/statics/js/app.js
document.addEventListener("DOMContentLoaded", function () {
  const loadMoreButton = document.getElementById("loadMore");
  const postList = document.getElementById("postList");

  let cursor = loadMoreButton.getAttribute("data-cursor");

  loadMoreButton.addEventListener("click", function () {
    fetch("/load", {
      method: "POST",
      headers: {
        "Content-Type": "application/json",
      },
      body: JSON.stringify({
        cursor: cursor,
      }),
    })
      . . .
  });
});
When the Load More button is clicked, a POST request will be sent to /load to retrieve the next batch of posts. Again, notice that you need to send the cursor back to the server, making sure they are always in sync.
Next, create a route handler for /load. This route handler takes the cursor and retrieves the next ten posts from the database. Remember to skip one so the post that cursor is pointing at will not be duplicated.
app.post("/load", async function (req, res) {
  const { cursor } = req.body;

  const posts = await prisma.post.findMany({
    take: pageSize,
    skip: 1,
    cursor: {
      id: Number(cursor),
    },
  });

  const last = posts.at(-1);
  const newCursor = last.id;

  res.status(200).json({
    posts: posts,
    cursor: newCursor,
  });
});
This handler will send a 200OK response back to the frontend, along with the retrieved posts, which will again be picked up by the frontend JavaScript code.
/statics/js/app.js
document.addEventListener("DOMContentLoaded", function () {
  const loadMoreButton = document.getElementById("loadMore");
  const postList = document.getElementById("postList");

  let cursor = loadMoreButton.getAttribute("data-cursor");

  loadMoreButton.addEventListener("click", function () {
    fetch("/load", {
      method: "POST",
      headers: {
        "Content-Type": "application/json",
      },
      body: JSON.stringify({
        cursor: cursor,
      }),
    })
      .then((response) => response.json())
      .then((data) => {
        if (data.posts && data.posts.length > 0) {
          data.posts.forEach((post) => {
            const li = document.createElement("li");
            const a = document.createElement("a");

            a.href = "#";
            a.textContent = post.title;

            li.appendChild(a);
            postList.appendChild(li);
          });
          cursor = data.cursor;
        } else {
          loadMoreButton.textContent = "No more posts";
          loadMoreButton.disabled = true;
        }
      })
      .catch((error) => {
        console.error("Error loading posts:", error);
      });
  });
});
Conclusion
Both the offset and cursor strategies have their pros and cons. For example, the offset strategy is the only option if you want to jump to any specific page.
However, this strategy does not scale at the database level. If you want to skip the first 1000 items and take the first 10, the database must traverse the first 1000 records before returning the ten requested items.
The cursor strategy is much easier to scale because the database can directly access the pointed item and return the next 10. However, you cannot jump to a specific page using a cursor.
Lastly, before we wrap up this tutorial, here are some resources you might find helpful if you are creating pagination systems with a different ORM framework.
Happy coding!