Loading course content...
Code Playground is only enabled on larger screen sizes.
In this lesson, we are going to explore some of the most commonly used HTML tags, their purposes, and how to use them effectively in your web applications.
The HTML document is made of different HTML elements in a nested structure.
Most elements have both an opening tag and a closing tag:
<tag>. . .</tag>In this case, <tag> is the opening tag, and </tag> is the closing tag, and together, they define an HTML element.
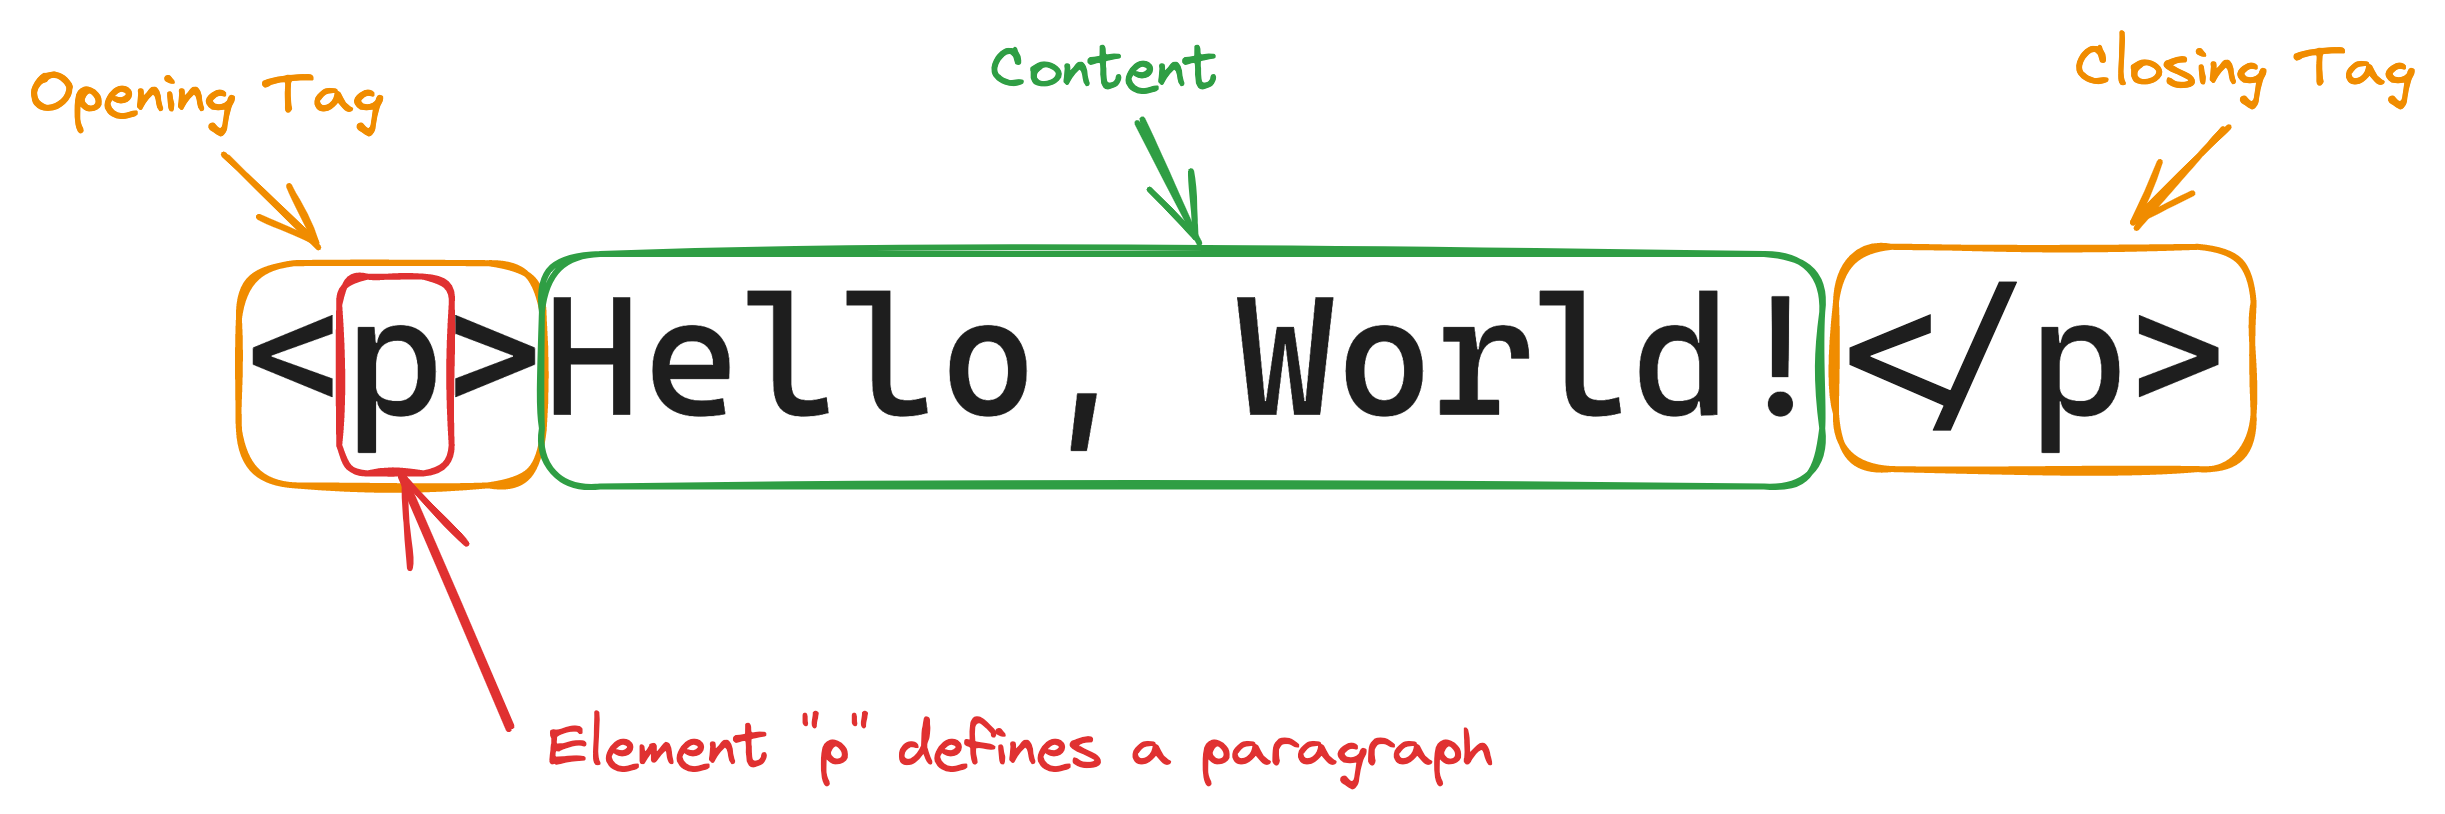
An element could hold textual content between the opening and closing tags.
<tag>Hello, world!</tag>Or wrap around other elements, forming a nested structure.
<tag>
<tag>. . .</tag>
<tag>
<tag>. . .</tag>
</tag>
</tag>Inside the opening tag, you can define attributes, which are used to specify additional information about the element, such as its class, id, and so on.
<tag attribute="value">. . .</tag>The attribute is usually in a key/value pair, and the value must always be enclosed inside matching quotes (either double or single).
There are some exceptions to these general formats.
For example, the <br /> element, which creates a line break, does not need an opening tag.
Some attributes, such as multiple, do not require a value.
However, you should remember that if an element does require a pair of tags, then it should never be overlooked.
In most cases, the webpage could still render correctly, but as the structure of your HTML document grows more complex, unexpected errors may occur.
The paragraph is probably the most commonly used HTML element, defined by <p></p>.
It is a block-level element, meaning each paragraph will start on a new line.
<body>
<p>This is the first paragraph.</p>
<p>This is the second paragraph, which starts on a new line.</p>
</body>Without the <p> element, your browser will automatically ignore the extra white spaces and render the text in a single line.
<!-- prettier-ignore -->
<body>
This is the first paragraph.
This is the second paragraph, which starts on a new line.
</body>You'll need to use the <br /> element if you want to add a line break inside a paragraph element. This is one of those HTML elements that does not require an opening tag.
<body>
<p>
This is the first paragraph.<br />
This is the second paragraph, which starts on a new line.
</p>
</body>When writing an article, it is good to add headings between paragraphs to make the article more organized.
An HTML document works the same way.
HTML offers six different levels of headings from <h1> to <h6>.
<h1>Heading 1</h1>
<h2>Heading 2</h2>
<h3>Heading 3</h3>
<h4>Heading 4</h4>
<h5>Heading 5</h5>
<h6>Heading 6</h6>These heading create a hierarchical structure, with <h1> being the top heading, which plays a special role in the webpage.
There should only be one <h1> element in each HTML document, and it should summarize the entire page.
Sometimes, you may want to emphasize specific words and paragraphs by giving them different formats, such as making them appear bold, italic, or underlined.
HTML provides formatting elements that can help achieve this effect.
<b></b>
<strong></strong>
<i></i>
<em></em>
<mark></mark>
<small></small>
<del></del>
<ins></ins>
<sub></sub>
<sup></sup><b> and <strong> elements have the same effect. They both make the enclosed text appear bold.<p>
Lorem ipsum <b>dolor sit</b> amet consectetur
<strong>adipisicing elit</strong>.
</p>Even though they have the same appearance, they serve different purposes for browsers and search engines.
<b> only makes the text bold without adding any particular meaning, while <strong> indicates that the enclosed texts have substantial importance.
<i> and <em> elements are similar. They both turn the text into italic form.<i> does not indicate any special meaning, while <em> defines an emphasized text, displayed in italic form.
<p>Lorem ipsum <i>dolor sit</i> amet consectetur <em>adipisicing elit</em>.</p><mark> element creates highlighted texts.<p>Lorem ipsum <mark>dolor sit</mark> amet consectetur adipisicing elit.</p><small> element defines small text.<p>Lorem ipsum <small>dolor sit</small> amet consectetur adipisicing elit.</p><del> element indicates deleted text, displayed by adding strikethrough across the enclosed text.Similarly, the <ins> element is used to indicate inserted text, which is displayed as underlined text.
<p>
Lorem ipsum <del>dolor sit</del> amet <ins>consectetur adipisicing</ins> elit.
</p><sub> and <sup> elements defines subscript and superscript respectively.<p>
Lorem ipsum <sub>dolor sit</sub> amet <sup>consectetur adipisicing</sup> elit.
</p>Sometimes, the default representations of these formatting elements are inadequate to express their intended meanings.
For example, the <del> element indicates deleted texts with a strikethrough, which is easy to understand.
However, the <ins> element uses underline to represent insertions, which can be very confusing.
To improve the default appearance of these elements, you can use a style attribute like this:
<p>
Lorem ipsum <del style="color: red;">dolor sit</del> amet
<ins style="color: green;">consectetur adipisicing</ins> elit.
</p>Of course, this works for almost all HTML elements, not just the formatting elements. The style of an HTML element is defined in a key/value pair format.
<p style="key: value;">. . .</p>The semi-colon (;) marks the end of a style statement, after that you can define another style.
<p style="color: red; text-decoration: underline;">
Lorem ipsum dolor sit amet consectetur adipisicing elit.
</p>There are many more styles you could define for each element, and we will discuss more about them once we get to the CSS part of our course.
So far, we've only been discussing elements used to display content, such as texts, lists, and images.
There is, in fact, a whole other category of elements in HTML in charge of organizing elements.
They are not designed to display any specific type of content, but instead, they act as a container for other elements.
When combined with CSS, they can create different layouts for the webpage.
Some of the commonly used layout elements are shown in the list below.
<header>: Defines a header section for the document, usually located at the top of the webpage.<nav>: Defines a navigation bar. For most webpages, it is located at the top with the header, but some developers put it on the side of the page.<section>: Defines a section for the document.<article>: Defines an independent section in the webpage.<aside>: Content aside from the main content, such as a sidebar.<footer>: A footer section located at the bottom of the webpage.<details>: Creates a tab that the user can open and close.<summary>: Creates a heading for the <details> element. It should be placed inside the <details> element.<details>
<summary>Lorem ipsum dolor sit amet consectetur adipisicing elit</summary>
Lorem ipsum dolor sit amet consectetur. . .
</details><div>: Short for division. It is a generic, non-semantic element that creates a block in the webpage.Unlike semantic elements such as <header> and <footer>, which clearly define their purpose, <div> does not convey any specific meaning about its content.
Semantic elements improve SEO and accessibility by helping search engines better understand the page structure.
However, in real-world scenario, many sections of a webpage don’t fit neatly into predefined semantic elements. Because of this, developers often use <div> to organize content and structure layouts.
Without CSS, these layout elements (except for <details> and <summary>) will have the same appearance, and not doing what they are supposed to do.
But don't worry, we will come back to this topic later. For now, you only need to know that these elements are primarily used to create page layouts.
<!DOCTYPE html> <html lang="en"> <head> <meta charset="UTF-8"> <meta name="viewport" content="width=device-width, initial-scale=1.0"> <title>Document</title> <link rel="stylesheet" href="/styles.css"> </head> <body> <header> <h1>HTML Elements Demo Page</h1> <p> This page demonstrates core text, formatting, and layout elements in HTML. </p> </header> <nav> <a href="#">Home</a> <a href="#">Docs</a> <a href="#">About</a> </nav> <main> <section> <h2>Text Content Elements</h2> <h1>Heading 1</h1> <h2>Heading 2</h2> <h3>Heading 3</h3> <h4>Heading 4</h4> <h5>Heading 5</h5> <h6>Heading 6</h6> <p> This is a paragraph. It contains <a href="#">a link</a> and explains basic text structure. </p> <ul> <li>Unordered list item 1</li> <li>Unordered list item 2</li> </ul> <ol> <li>Ordered list item 1</li> <li>Ordered list item 2</li> </ol> <dl> <dt>HTML</dt> <dd>HyperText Markup Language</dd> <dt>CSS</dt> <dd>Cascading Style Sheets</dd> </dl> <blockquote cite="https://example.com"> “This is a blockquote element used to quote external sources.” </blockquote> <p> <abbr title="HyperText Markup Language">HTML</abbr> is used to structure content. </p> <p><cite>– The Web Book</cite></p> </section> <section> <h2>Text Formatting Elements</h2> <p><strong>Strong</strong> text is used for emphasis.</p> <p><em>Emphasized</em> text is italicized.</p> <p><b>Bold</b> and <i>Italic</i> without semantic meaning.</p> <p>This is <mark>highlighted</mark> text.</p> <p>Use <code><code></code> for inline code.</p> <pre><code>const hello = "world";</code></pre> <p> Text can be <small>small</small> or <del>deleted</del> or <ins>inserted</ins>. </p> <p>H<sub>2</sub>O (subscript), and E = mc<sup>2</sup> (superscript)</p> <p><kbd>Ctrl + C</kbd> for copy</p> </section> <section> <h2>Layout Elements</h2> <article> <h3>Article Title</h3> <p> This is an <code><article></code> element, useful for self-contained content. </p> </article> <aside> <h4>Aside Section</h4> <p> This is an <code><aside></code>, often used for side content or tips. </p> </aside> <section> <h4>Nested Section</h4> <p> This is a nested <code><section></code> inside another section. </p> </section> <div> <p> This content is wrapped in a <code><div></code>, a generic block container. </p> </div> <details> <summary>Lorem ipsum dolor sit amet consectetur adipisicing elit</summary> Lorem ipsum dolor sit amet consectetur. . . </details> </section> </main> <footer> <p>© 2025 XXXX Corp. Built with ❤️ using HTML.</p> </footer> </body> </html>