How to Send Emails with Django

In today's interconnected world, email remains a vital means of communication for businesses, organizations, and individuals. In this article, we will discuss how to send emails using Django.

Configuring the project

First, let us discuss the configuration process. To begin, locate the settings.py file within your project directory, and proceed to append the following lines of code:

python
EMAIL_BACKEND = 'django.core.mail.backends.smtp.EmailBackend'
EMAIL_HOST = 'smtp.gmail.com'
EMAIL_HOST_USER = '<your_email>'
EMAIL_HOST_PASSWORD = '<your_password>' # Note that this should be the App password rather than your Google account password
EMAIL_PORT = 465
EMAIL_USE_SSL = True

In the example provided, we're utilizing the default SMTP backend and Gmail service to handle email sending. To personalize it for your needs, simply replace <your_email> with your email address, and <your_password> with the App password generated from your Google account.

To generate the App password, you can follow these steps:

  • Visit the Google Account page.
  • Navigate to the Security section and select 2-Step Verification. You must turn on the 2-Step Verification before proceeding to the next step.
  • Under App passwords, choose the Mail app and select the device for which you want to generate the app password.
  • Click the Generate button to create the app password.
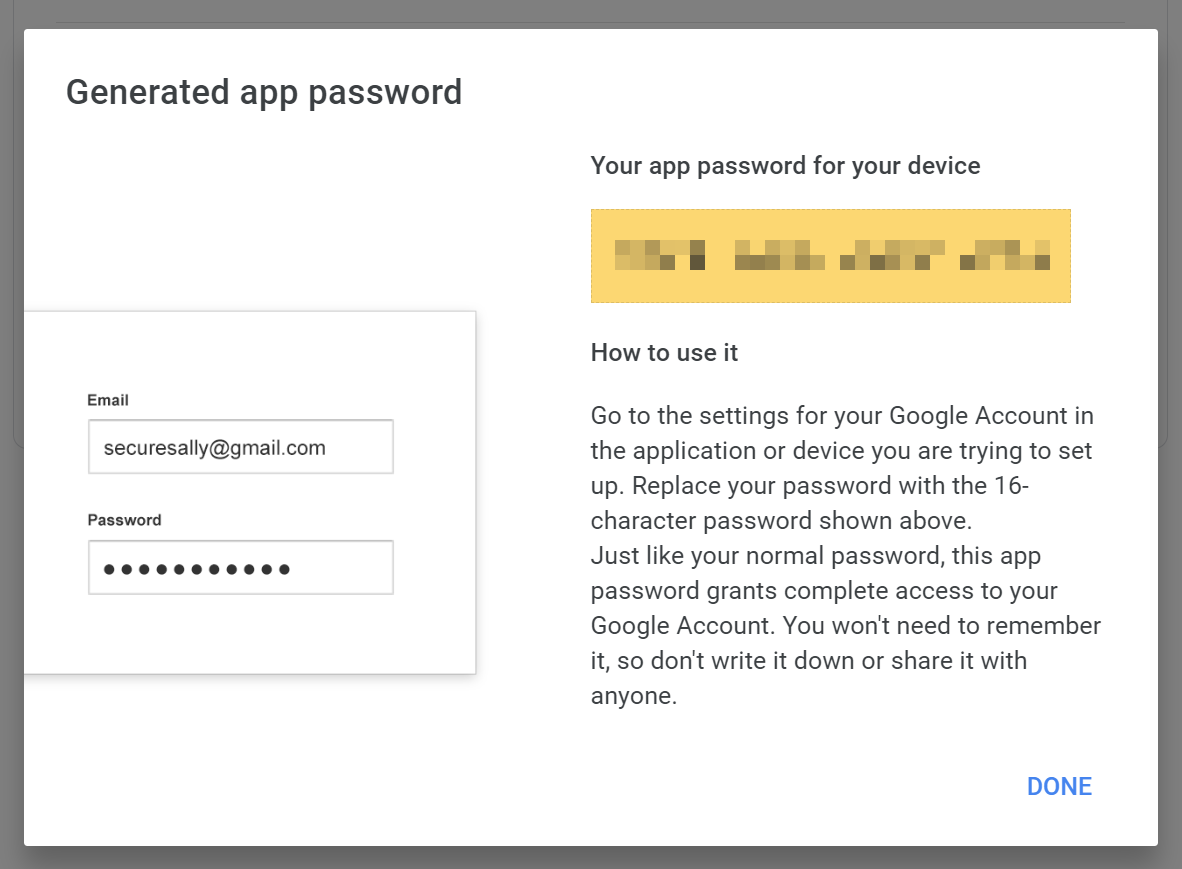
Generated app password

Following these steps will give you a secure and personalized configuration for sending emails in your Django application.

Sending your first email

Next, you can proceed to send a test email. Go to views.py:

python
from django.shortcuts import render
from django.http import HttpResponse
from django.core.mail import send_mail
 
# Create your views here.
 
 
def send(request):
    send_mail(
        "Subject here",
        "Here is the message.",
        "from@example.com",
        ["<your_email_address>"],
        fail_silently=False,
    )
    return HttpResponse("Email sent.")
 

This example uses the default send_mail() method to send an email, which takes the following parameters:

  • subject: The subject of the email.
  • message: The actual content of the email.
  • from_email: The email address that this email is sent from. If not set, Django will use the value of the DEFAULT_FROM_EMAIL setting. You may add this setting to the settings.py file.
  • recipient_list: A list of email addresses. Each member of recipient_list will see the other recipients in the “To:” field of the email message.
  • fail_silently: A boolean value. When it’s False, send_mail() will raise an smtplib.SMTPException if an error occurs.

In order to test this code, create a route that points to this send() view.

python
from app import views
 
urlpatterns = [
    path('send/', views.send),
]

Start the Django application and send a request to http://127.0.0.1:8000/send/.

cmd
curl http://127.0.0.1:8000/send/

Wait a few seconds, and you should get the following email in your inbox.
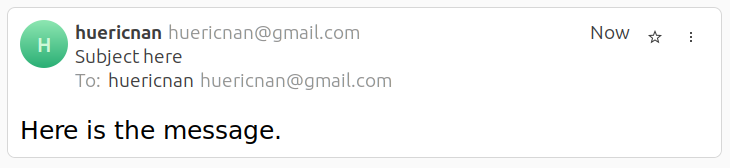
email

Sending emails in bulk

To send multiple emails together, you may use the send_mass_mail() method instead.

python
from django.shortcuts import render
from django.http import HttpResponse
from django.core.mail import send_mass_mail
 
# Create your views here.
 
 
def send(request):
 
    mails = (
        ("Subject #1", "Message #1", "from@example.com", ["<email_address>"]),
        ("Subject #2", "Message #2", "from@example.com", ["<email_address>"]),
        ("Subject #3", "Message #3", "from@example.com", ["<email_address>"]),
        ("Subject #4", "Message #4", "from@example.com", ["<email_address>"]),
        ("Subject #5", "Message #5", "from@example.com", ["<email_address>"]),
    )
    send_mass_mail(mails)
    return HttpResponse("Emails sent.")
 

The <email_address> placeholder can be different values. Send a request to the route, and you should receive five emails.
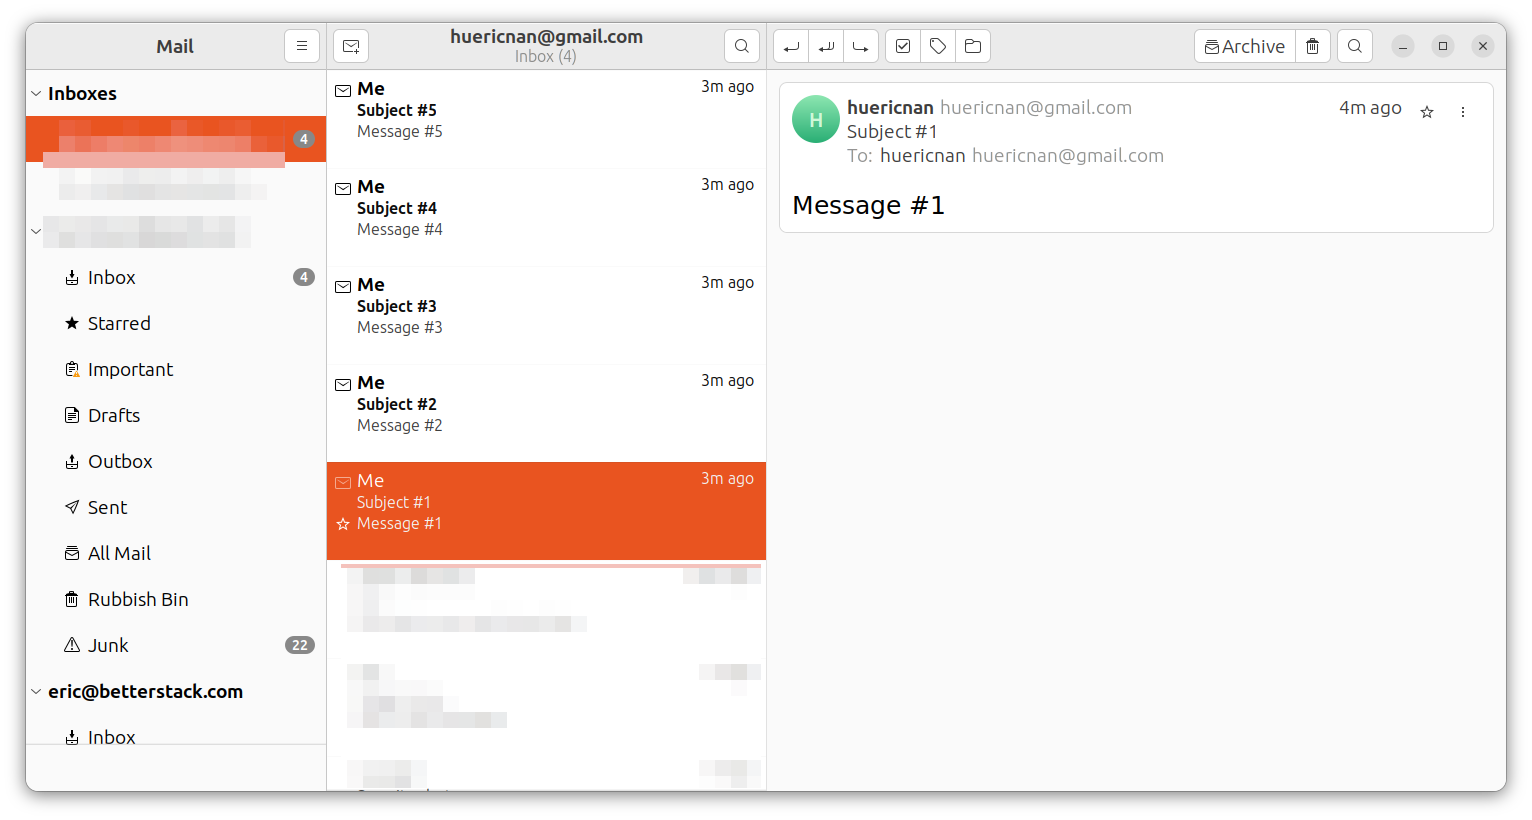
multiple emails

Sending emails with attachments

Both send_mail() and send_mass_mail() methods are, in fact, wrappers using the EmailMessage class. They provide shortcuts allowing us to send emails more efficiently. However, if you want to do something more complex, for example, an email with attachments, you'll have to use the EmailMessage class directly.

python
def send_attachment(request):
    email = EmailMessage(
        "Hello",
        "Body goes here",
        "from@example.com",
        ["huericnan@gmail.com"],
    )
 
    image_path = os.path.join('files/image.png')
    with open(image_path, 'rb') as f:
        img_data = f.read()
 
    email.attach("image.png", img_data, "image/png")
 
    email.send()
 
    return HttpResponse("Email sent with attachment.")

The attach() method takes three arguments: filename, content, and mimetype. filename is the name of the file attachment as it will appear in the email, content is the binary data that will be contained inside the attachment and mimetype is the optional MIME type for the attachment.
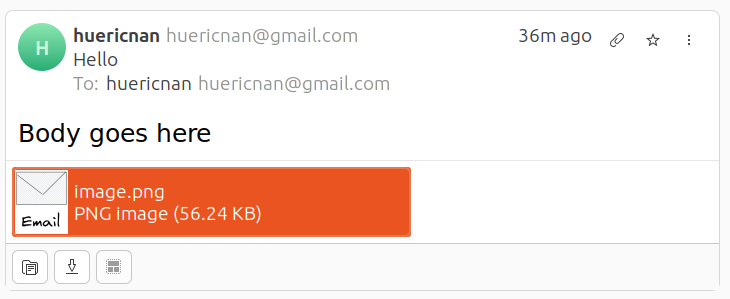
email with attachment

Alternatively, you can create an attachment directly using a file in your filesystem without having to read the binary data first.

python
email.attach_file("path/to/file")

Sending HTML emails

Nowadays, most emails are crafted with HTML to make them more appealing to the readers. And Django also provides a way to send emails written in HTML.

python
from django.core.mail import EmailMultiAlternatives
 
def send_html(request):
    subject, from_email, to = "Hello!", "from@example.com", "huericnan@gmail.com"
    text_content = "This is a message written in HTML."
    html_content = "<p>This is an <strong>important</strong> message.</p>"
    email = EmailMultiAlternatives(subject, text_content, from_email, [to])
    email.attach_alternative(html_content, "text/html")
    email.send()
 
    return HttpResponse("HTML email sent.")

The EmailMultiAlternatives class offers a way to send emails crafted in different formats. Notice that, in this example, there is a text_content and a html_content. By default, the body of the email will be html_content. However, if the recipient cannot open HTML, the text_content will be displayed instead.

HTML email

Creating templates for your emails

Sometimes, the email you send to different recipients might be different. For example, if you send account confirmation emails to different users, their usernames should differ. In this case, you should create a template for the emails. First, create a template directory for your app:

text
.
├── app
│   ├── admin.py
│   ├── apps.py
│   ├── __init__.py
│   ├── migrations
│   ├── models.py
│   ├── templates
│   │   ├── email.html
│   │   └── email.txt
│   ├── tests.py
│   └── views.py
├── djangoEmail
├── files
└── manage.py

email.txt

text
Congratulations, {{username}}! Your account has been successfully activated!

email.html

html
<!doctype html>
<html lang="en">
  <head>
    <meta charset="UTF-8" />
    <meta http-equiv="X-UA-Compatible" content="IE=edge" />
    <meta name="viewport" content="width=device-width, initial-scale=1.0" />
    <title>Congratulations!</title>
  </head>
  <body>
    <h2>Congratulations, {{username}}!</h2>
    <p>Your account has been successfully activated!</p>
  </body>
</html>

Modify the send_html() view to use the templates instead:

python
from django.template.loader import get_template
 
def send_html_template(request):
    subject, from_email, to = "Hello!", "from@example.com", "huericnan@gmail.com"
 
    text = get_template('email.txt')
    html = get_template('email.html')
 
    username = 'jack'
 
    d = { 'username': username }
 
    text_content = text.render(d)
    html_content = html.render(d)
 
    email = EmailMultiAlternatives(subject, text_content, from_email, [to])
    email.attach_alternative(html_content, "text/html")
    email.send()
 
    return HttpResponse("HTML email sent.")
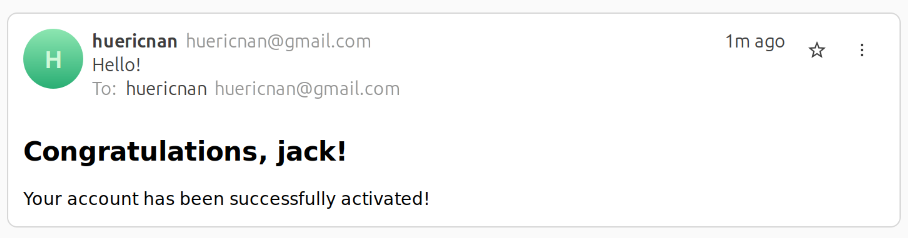
HTML email with template

Hope this article has been of assistance to you. Thanks for reading!

Learn, Build & Launch

With Our Full Stack Dev Roadmap with Next.js Boilerplate

Start for FREE 🎉

Subscribe below to grab our free Full-Stack Web Developer Starter Kit 👇

Also follow us onorwhere we share coding tips daily.

Course Outline
Introduction+
  • 1.Course Introduction
HTML & CSS+
  • 1.Preparations
  • 2.HTML Elements
  • 3.Text Elements
  • 4.Layout Elements
  • 5.Cascading Style Sheet
  • 6.Basic Selectors
  • 7.Advanced Selectors
  • 8.Colors
  • 9.Loading Font
  • 10.Font Customization
  • 11.Text Customization
  • 12.Text Spacing
  • 13.Text Alignment
  • 14.Functions
  • 15.@ Rules
  • 16.Links
  • 17.Lists
  • 18.Tables
  • 19.Forms
  • 20.Form Fields
  • 21.Media Files
  • 22.Aspect Ratio
  • 23.Object Fit
  • 24.Cursor Behavior
  • 25.Scroll Behavior
  • 26.Visibility & Opacity
  • 27.Box Shadow
  • 28.Color Background
  • 29.Image Background
  • 30.Background Attachment
  • 31.Gradient
  • 32.Blend Modes
  • 33.The Box Model
  • 34.Border
  • 35.Padding & Margin
  • 36.Element Size
  • 37.Display Types
  • 38.Overflow
  • 39.Float
  • 40.Position
  • 41.Z index
  • 42.The Column Layout
  • 43.The Grid Layout
  • 44.Grid Flow
  • 45.Grid Gap
  • 46.Grid Spanning
  • 47.Grid Alignment
  • 48.The Flexbox Layout
  • 49.Flex Gap
  • 50.Flex Order
  • 51.Basis, Grow & Shrink
  • 52.Flexbox Alignment
  • 53.Calculator
  • 54.Filters
  • 55.Transforms
  • 56.Transition
  • 57.Transition Timing Functions
  • 58.Transition Delay
  • 59.Animations
  • 60.Animation Iteration Count
  • 61.Animation Direction
  • 62.Animation Fill Mode
  • 63.Responsive Design
  • 64.Viewport
  • 65.Media Query
  • 66.Responsive Media
  • 67.Responsive Text
  • 68.Responsive Layout (Flexbox)
  • 69.Responsive Layout (Grid)
  • 70.Responsive Layout (Legacy)
  • 71.Layout Without Media Query
  • 72.Recreating YouTube
  • 73.Building the Layout
  • 74.Building the Navbar
  • 75.Building the Sidebar
  • 76.Building the Main Section
JavaScript Fundamentals+
  • 1.Introduction
  • 2.Basic Syntax
  • 3.Variables
  • 4.Data Types
  • 5.Numbers & BigInt
  • 6.Strings
  • 7.Boolean Values
  • 8.Undefined & Null
  • 9.Type Conversion
  • 10.If Statements
  • 11.Switch Statements
  • 12.While Loops
  • 13.For Loops
  • 14.Introducing Functions
  • 15.Variable Scope
  • 16.Arrays
  • 17.Mutating Array
  • 18.Searching Array
  • 19.Sorting Array
  • 20.Looping Array
  • 21.Objects
  • 22.Looping Object
  • 23.JSON
  • 24.Symbols
  • 25.Maps
  • 26.Sets
  • 27.Define Functions
  • 28.Function Arguments
  • 29.Rest Parameter & Spread Syntax
  • 30.Error Handling
  • 31.Pure Functions
  • 32.Functions as Value
  • 33.Higher Order Functions
  • 34.Function Factory
  • 35.Function Currying
  • 36.Function Wrapper
  • 37.Recursion
  • 38.Closure
  • 39.Methods
  • 40.Investigating "this"
  • 41.Losing "this"
  • 42.Constructor Functions
  • 43.Getters & Setters
  • 44.Prototypes Introduction
  • 45.Creating Prototypes
  • 46.Inspecting Prototypes
  • 47.Constructor with Prototype
  • 48.The Class Notation
  • 49.Class Inheritance
  • 50.Static Properties
  • 51.Private Properties
  • 52.Object Oriented Programming
  • 53.A Banking App
  • 54.Working with Date
  • 55.The Math Object
  • 56.JavaScript Modules
  • 57.Throwing Errors
  • 58.Asynchronous Programming
  • 59.Promise
  • 60.Resolve Promise
  • 61.Promise Chaining
  • 62.Async & Wait
  • 63.Best Practices
JavaScript in the Frontend+
  • 1.The DOM Tree
  • 2.Selecting Elements in the DOM
  • 3.DOM Navigation
  • 4.Changing Elements
  • 5.Adding Elements
  • 6.Removing Elements
  • 7.Event Handling
  • 8.Event Propagation
  • 9.Some Common Events
  • 10.Image Slider: Creating HTML
  • 11.Image Slider: Adding Styles
  • 12.Image Slider: Adding Scripts
  • 13.Image Slider That "Slides"
  • 14.Regular Expressions
  • 15.Regex Flags
  • 16.Regex Matching Character Sets
  • 17.Regex Boundary
  • 18.Regex Groups & Quantifiers
  • 19.Regex Lookahead & Lookbehind
  • 20.Regex Related Methods
  • 21.Calculator
  • 22.Canvas
JavaScript in the Backend+
  • 1.Setting Up a Dev Environment
  • 2.Network & HTTP
  • 3.A Basic Web App
  • 4.Express.js
  • 5.Routing
  • 6.MVC Architecture
  • 7.The Model Layer
  • 8.CRUD Operations
  • 9.The Controller Layer
  • 10.The View Layer
  • 11.Blog
  • 12.ORM Integration
  • 13.Creating a Post
  • 14.Uploading Files
  • 15.Showing a Post
  • 16.Updating a Post
  • 17.Deleting a Post
  • 18.Database Relations
  • 19.CRUD Tags
  • 20.Adding & Removing Tags
  • 21.Showing Tags & Posts
  • 22.Middleware
  • 23.Browser Data Storage
  • 24.User Registration
  • 25.User Authentication
  • 26.User Authorization
  • 27.User Management
  • 28.Going to Production
React.js+
  • 1.Introducing React.js
  • 2.Setting Up React Project
  • 3.React Project Structure
  • 4.JSX
  • 5.Conditional Rendering
  • 6.List Rendering
  • 7.Adding Styles
  • 8.Components
  • 9.Import & Export Component
  • 10.Variables in Components
  • 11.Props
  • 12."children" Prop
  • 13.Event Handlers
  • 14.Event Handlers & Props
  • 15.Event Propagation
  • 16.Event Prevent Default
  • 17.Introducing State
  • 18.States are Local
  • 19.Object States
  • 20.Multiple States
  • 21.Shared States
  • 22.Form Handling
  • 23.Component Lifecycle
  • 24.Built-In Components
  • 25.Todo List
  • 26.Add New Task
  • 27.Remove Task
  • 28.Edit Task
  • 29.Complete a Task
  • 30.View Pending Tasks
  • 31.Organize State with Reducer
  • 32.The Reducer Function
  • 33.Dispatch Actions
  • 34.Passing Data with Context
  • 35.Context Provider
  • 36.Access Context
  • 37.Use Context with State
  • 38.Manipulate DOM with Refs
  • 39.Side Effects
  • 40.Side Effect Dependencies
  • 41.Side Effect Clean Up
  • 42.Weather App
  • 43.Get Weather by Coordinate
  • 44.Get Weather by City
  • 45.Display Weather by User Location
  • 46.Creating Custom Hooks
  • 47.Other React Hooks
  • 48.Rules of React
  • 49.Building a Full-Stack Blog App
  • 50.Project Setup
  • 51.React Router
  • 52.List Posts
  • 53.Create a New Post
  • 54.Show a Single Post
  • 55.Update a Post
  • 56.Delete a Post
  • 57.Implement Dark Theme
Full-Stack with Next.js+
  • 1.Next.js Basics
  • 2.Routing
  • 3.Pages & Layout
  • 4.Server vs. Client Components
  • 5.API Routes
  • 6.Server Actions
  • 7.Database Integration
  • 8.Data Fetching
  • 9.Error Handling
  • 10.Middleware
  • 11.Links, Navigation & Redirection
  • 12.Images
  • 13.Scripts
  • 14.Fonts
  • 15.Lazy Loading
  • 16.Caching
  • 17.Loading UI
  • 18.SaaS Platform
  • 19.User Authentication
  • 20.Magic Link
  • 21.Custom Emails
  • 22.Protecting Routes
  • 23.OAuth Providers
  • 24.Dashboard
  • 25.Role Based Access Control
  • 26.Payment Integration
  • 27.Pricing Page
  • 28.Stripe Checkout
  • 29.Payment Webhook
AI for Full-Stack Developers+
  • 1.What Are LLMs?
  • 2.Setting Up OpenAI Account
  • 3.Tokens
  • 4.Context Window
  • 5.Compare LLM Models
  • 6.OpenAI Model Playground
  • 7.Building a Chatbot
  • 8.Send Message to OpenAI
  • 9.Talking to GPT-4
  • 10.Talking to GPT-5
  • 11.Response Streaming
  • 12.Sending Data
  • 13.Receiving Data
  • 14.Streaming with Server Sent Events
  • 15.Chatbot Streaming Backend
  • 16.Chatbot Streaming Frontend
  • 17.Prompt Engineering
  • 18.System Prompt
  • 19.Role Switcher
  • 20.Prompting Techniques
  • 21.Structured Output
  • 22.Get Current Weather
  • 23.Tools & Functions
  • 24.Structured Output vs. Tool Calling
  • 25.What is an Agent
  • 26.What is RAG
  • 27.Chunking & Embedding
  • 28.Building a RAG Agent
  • 29.Setting Up the Database
  • 30.Document Processing
  • 31.Split Text into Chunks
  • 32.Generate Embeddings
  • 33.Listing Processed Documents
  • 34.Chat with RAG Agent
  • 35.Semantic Search
  • 36.Generate a Response
Recent Community Articles
  • The Ultimate Guide to Becoming an AI Engineer
  • How to Learn Full-Stack Web Development in 2025 (With Projects)
  • Top Website Optimization Methods in 2025
  • How to Build Interactive Forms Using HTML and CSS
  • How to Create a Modern App with Django and Vue
  • How to Send HTTP Requests Using JavaScript
  • Vue.js Fundamentals
  • How to Reverse a String in JavaScript
  • How to Reverse an Array in JavaScript
  • JavaScript Fundamentals 2025
  • Configuring the project
  • Sending your first email
  • Sending emails in bulk
  • Sending emails with attachments
  • Sending HTML emails
  • Creating templates for your emails

Full Stack AI Dev

RoadmapCommunityPricing

SaaS Boilerplate

Next.js BoilerplateDocumentation

Contribute

Write for UsStyle Guide

Free Tools

HTML CompilerJavaScript CompilerNode.js CompilerReact CompilerNext.js Compiler

Legals

Privacy PolicyTerms of ServiceContact Us
© 2026TheDevSpace.io| All Rights Reserved
RoadmapSaaS BoilerplatePricingCommunity
CheatsheetsHTML CompilerJavaScript CompilerNode CompilerReact CompilerNext.js Compiler
Get Started
CourseNext.js BoilerplatePricingCommunity
Freebies
CheatsheetsHTML CompilerJavaScript CompilerNode CompilerReact CompilerNext.js Compiler